First of all, I know everyone doesn't have photoshop, so don't worry, everything is possible with another logicial who actually copy photoshop like "the GIMP". It's free, just be carrefull when uploading, because of viruses.
Also, I've got a graphic tablet and it help A LOT. You can have basics one for $50, if it's not to really draw but only to edit, really you don't need better and most expensives ones.
1. Crop pictures & straigh skylines.
When using the cropping tool, you can of course, decide to chop your image as you want, but also rotate it.
That's really easy to use, so you've got no excuses for the leaning skyline by now.
2. Editing on colors.
On advanced photoshop you have "automatic" options that does the job for you. I always try them, to fix what's the problem with my picture when I'm not happy with the colours. Then, I do the job myself, basis on wich problem I've got between:
-Color tones
-Color contrast
-Colors
Here's a job on the colors (I will explains colors in detail later, ctrl+B):
But in most of the time, the problem is contrast, so here's what you get when editing on levels (ctrl+L):
I usually works with the middle tones.For specifics needs, black only gonna pushes the dark colors and white gonna do a cleaning job on the grey/light colors by pushing them whiter.
Middle tones are acting on both, helping a picture to found the right balance.
If you're picture is too dark, like this one:
You need to push the middle tone into the black side, asking for more light:
But, in the process you're gonna loose detail on the lighter part of the pictures and background, so there's a simple tips to catch them back: ctrl+alt+2
It's gonna select only the under exposure parts...
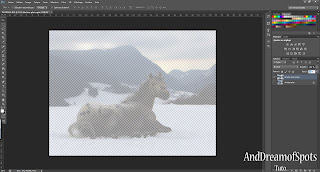
Then you have to do ctrl+c (copy) and ctrl+v (paste) and a new copy will appears with the "ghost" of your picture:
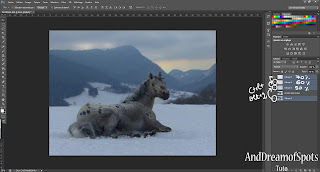
So now, you need to change this new copy from her "normal" state to a "product" who's gonna act on the background copy:
With a bit of opacity regulation, you will have a picture well balanced as you wishes it.
So, when your picture is too light, you just have to push your levels on the white (opposite of this example so) to ask for less light. And do as much ghosts as needed.
This method also work for specifics cases like this one:
You have a beautiful sky with lots of colours, but in the end you've got just a light grey sky.
And that's not the only problem on this picture, the colors are too blue, and it didn't help. So, duplicate your background picture:
And edit colors on the duplicata copy! (very important)
To speaks a bit about colors, in the nature you've got three basis colors: blue (cyan), yellow and red (magenta). If you melt them, you can optain 3 more colors: orange (red+yellow), purple (red+blue) and green (yellow+blue) that are known as the complementary colors. Those are ALWAYS a perfect win and will rules EVERY other colors (not kidding).
If that sounds too difficult for you, just use the automatic button, but it doesn't work great all the times. So it can worth it to learn a bit on manual settings.
Here's your picture well edited on colors:
Now your gonna turn the copy opacity into the right percentage (it vary) so you're gonna have a "ghost" again:
Superimposed to your background picture, it's gonna fix the right colors.
Now, you've got a light background to fix, so basis on the BACKGROUND copy, you're gonna use our magic tricks (ctrl+alt+2) and make a new ghost copy, and repeat it starting by the previous ghost as many times as needed. Every ghost copy must be reguled on opacity a little bit more than the first:
So here's what you got (without the color edit):
Now make this explode with colors variations! As the properties of your new setting is gonna impact on all your copies, your gonna need a "regulation copy". Choose "vibrant".
Adjust your settings to you wishes:
Now your picture is as you want, but still a bit darker, no problem, use the levels (on the background picture only)
Colors may be challenging, but with experience, it's gonna sounds easy to you too, just try as much as needed to understand it.
3. Cheating a little
To make your pictures more perfect, you may need to cheat on a little detail that ruins everything. On most cases, it's gonna be rebel wild grasses or flowers.
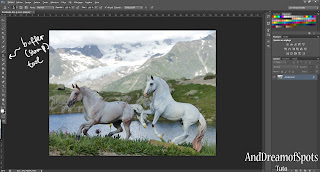
That's easy to remove with the buffer (stamp) tool!
Adjust your tool setting, I usually take it large for the subject plus with blurry definition, then choose the area you want to duplicate with alt+clic:
And paint over your problem:
Also, some things may be more difficult to erase, but don't worry, cheating for cheating: other pictures can provide you the area that you need:
And then with carefull painting...
Don't worry if your first try aren't perfect, this is not as simple as it looks and my ask you patience.
4. Adding living elements
Your figures doesn't live, and you may be an indoor photographer and didn't have a living nature for background at all. That's why you can also cheat a bit with painting brushes. Brushes are usually used on digital painting but also on fully edited pictures.
So, when you open your brushes settings, you've got a basic set of forms.
But as internet have no limits, you also can download a lot of them for free. JUST BE CAREFUL, viruses are as free and everywhere than the brushes you want.
When they are downloaded and installed (a few clic away)... you can play with them. Just think of new copies.
They can be adjusted on orientation & size (ctrl+T)
And combined with opacity (and colors):
Also, they cannot always have right form, and you may need to modify them. Just check the settings.
To finish, here's a last advice... if you need to define an area:
The eraser is your friend for scissoring on a better level than the magic wand:
That's the most complicated part, and the one I use the less. But don't be shy about it, used with good terms it can really be a plus.
*
Hope you liked this post and let me know if you need any other tips. Thanks you!


Aucun commentaire:
Enregistrer un commentaire