Affichage des articles dont le libellé est Tips. Afficher tous les articles

mardi 2 avril 2024

April Fool (and Happy Easter)

Every year, I crave about easter. Not because I love spring (that's false) but because of the chocolate figures! Ever since I'm a kid, I love to receive molded chocolate, I love to discover what I got (or choose what I will get).
In 2022, I staged a chocolate jump and ever since, I want to do more... This year I choose with love a beautiful easter bell and staged my jump with love!

End of the story? No.
Because it's not the picture I planned to make. To be more precise, everything I wanted is here: chocolate jump, fake ground to looks like an arena, our cherry tree (with the convenient fencing around)... that's truly great except...
I planned to do this picture in real, not in two pictures assembled with photoshop.

If that first part is 100% true:

You might have spot it 👀
Yesterday, there was a raging storm outside here, and I wasn't able to do my easter picture in front of our cherry tree, so I had to do it with photoshop (all by hand with my own skills, no AI involved). I did take the picture of the tree in between two rain shower and I took the rest inside then... the magic 🪄
 
 
That part is an april fool:

What I've learned from that? It was easy (long, but easy) and I plan to only do that kind of picture from now on. Less difficult, more enjoyable 👍
 

...directly inspired by the frustration I feel every time I am not able to have what I want in real. I truly value the fact that my pictures are not fake.
 

Even if I must admit that in the end it was fun and I like thoses two pictures, they are not so bad!
... But I will never stop to do pictures in situ, don't worry!


vendredi 4 août 2023

The making off... Daylight!

Ever since Coralie have posted the latest commission she did for me, we have been taken by storm.
Post like this demultiplies...

And instagram reshare too...

We are both truly happy that Daylight please you.

And I really want to say my feelings is that in the hobby you've got several people involved... the first artist is the sculptor, who gave every painter a blank canva to work on.
So thank to Morgen Kilbourn, wich also shared her enthousiasm!

The second artist who's involved is, of course, the painter. It's the person who's going to put all it's talent to make the best paintjob they can. Painter can paint horses on their own idea or following a commissionner idea.
In this story, we got Mule Deer Studio that I commisioned because I knew she was the one to paint somethin' as difficult as a wet horse.

And in the end, you've got the owner.
Who, in my case, is using their figures for photography purpose.
I've stated long ago that I loved better to own horses painted by other artists (in fact what I love with the hobby is to be able to own many different way to paint a horse) than keeping my own paintjob.
Every picture is my own way of contributing to the hobby.


So now that I've expressed my feelings about the artistry in our hobby, let's talk a bit more about Daylight painting process.

It all started several years ago, when I joined a French Appaloosa forum. Following the posts, I falled in love with a New Caledonia purebred appaloosa filly, Daylight. She grew up to a beautiful, near white looking few spot appaloosa and believe me, when she got on sale... I had a heartstroke not beeing able to buy her (1 - she was too far from me, 2 - I already had Amira and was more than happy with her).
But I saved pictures because I knew that one day, I'll own a miniature figure of her.

I'm sorry, I would not share that much pictures of her, as I'm not the owner of it.

The years go by and I never forget that wish I had, but also I never really found "the model" that clicked. Until... Xlurpie was released. I bought it in a heartbeat, knowing for sure it would be "my" Daylight. And I immediately got in touch with Coralie, to talk about my project: having a wet few spot appaloosa painted.

Coralie was enthousiastic about it, I shared her picture of the mare, luckily I got plenty of the mare dry and wet.

Photo credits to Daylight's owner.

We talked a lot about the project, I explained to Coralie that I do not wanted the horse to be completely wet but more wet in some area as it would have bathed/splashed. We got on the run for reference of wet splashed horses, I found some...

We discovered that it was easier to see splashing on a MUDDY horse :')

And also, while browsing again the appaloosa forum to found more angles, I get by this picture of another horse on the post...

Photo credits to Daylight's owner.

I and Coralie went nut about that splashing tail mark and decided to kept the idea. It is probably one of the thing MOST of people liked best about the custom...

Also, Coralie did several schemes to understand (and show me) how to process with that painting...

Caption say:
Really wet, mostly transparent
Really wet, not transparent

A bit in between there.

Photo credits to Daylight's owner.

Caption say:
+ or - dry
Middly wet
Really wet

She started painting, sending me every step and we kept talking in the making. Then it was time to gloss the paintjob and I got another scheme plan...

Caption say:
Not transparent
A bit transparent
Totally transparent

Transparent area intensity in painting

Wet area to gloss

Total


So you can see every step was planned to archieve that perfect wet look, with the most natural and realistic taste.

Daylight full album at Mule Deer Studio page 💦

I'm really, really glad everyone loved this project, that Coralie's work have it's own spotlight. She's talented, like many other EU artist... but also, beeing international is more difficult to be known.
No matter what you do in the hobby, if you're in EU, it's more difficult to be seen.


Speaking of France, we got really little liveshow and our artists lacks of viewing, their horses does not travel a lot. I probably should do a blog post one day about our artist, because all of them deserve a spotlight too.

Hope you loved this post. I want to inspire & be inspired, I want to never stop modelhorses pictures or project (only my wallet can stop me right now)!
I really loves how this hobby combine several artistry. As an artisan myself, I'm always glad to see artisan's success.

lundi 17 octobre 2022

the Mood Board - Choosing your horse portrait!

Yesterday I posted the portrait Sue Kern did for me of my gelding, Excalibur.
The search was difficult because it's not that easy to found a sculpture that looks like him. So, as far I did with Amira for her portraits, I choose on a "mood board". So I searched for a resin that have an attitude and body langage that reminded me of my pony.

I also wanted a Eberl resin, painted by Sue to match my Amira portrait n°2. So the two resins would kinda belong together.
If I see Amira galloping freely with energy in a field when I close my eyes, I see more Excalibur "showing off" in front of other horses (or sleeping in a corner, wich is less epic).

Of course, the best of the best, for both my horses would be to have original sculptures, I really wish this dream can come true one day or another, but waiting for that opportunity I'm really glad with how I managed to run thoses portraits on the closest look.

 See the "mood board"


For me that trotting lipizzaner, if you close your eyes on the lenght of the head, is pretty close. The body is really the same, the attitude too. Sue did a more fitting tail and reworked the head a bit.

Also, thoses two portraits were never introduced to their equine counterpart...

Now it's done! - And I like that!

And you, how would you choose a model for a portrait?


lundi 18 avril 2022

Happy Easter! + the anatomy of a picture

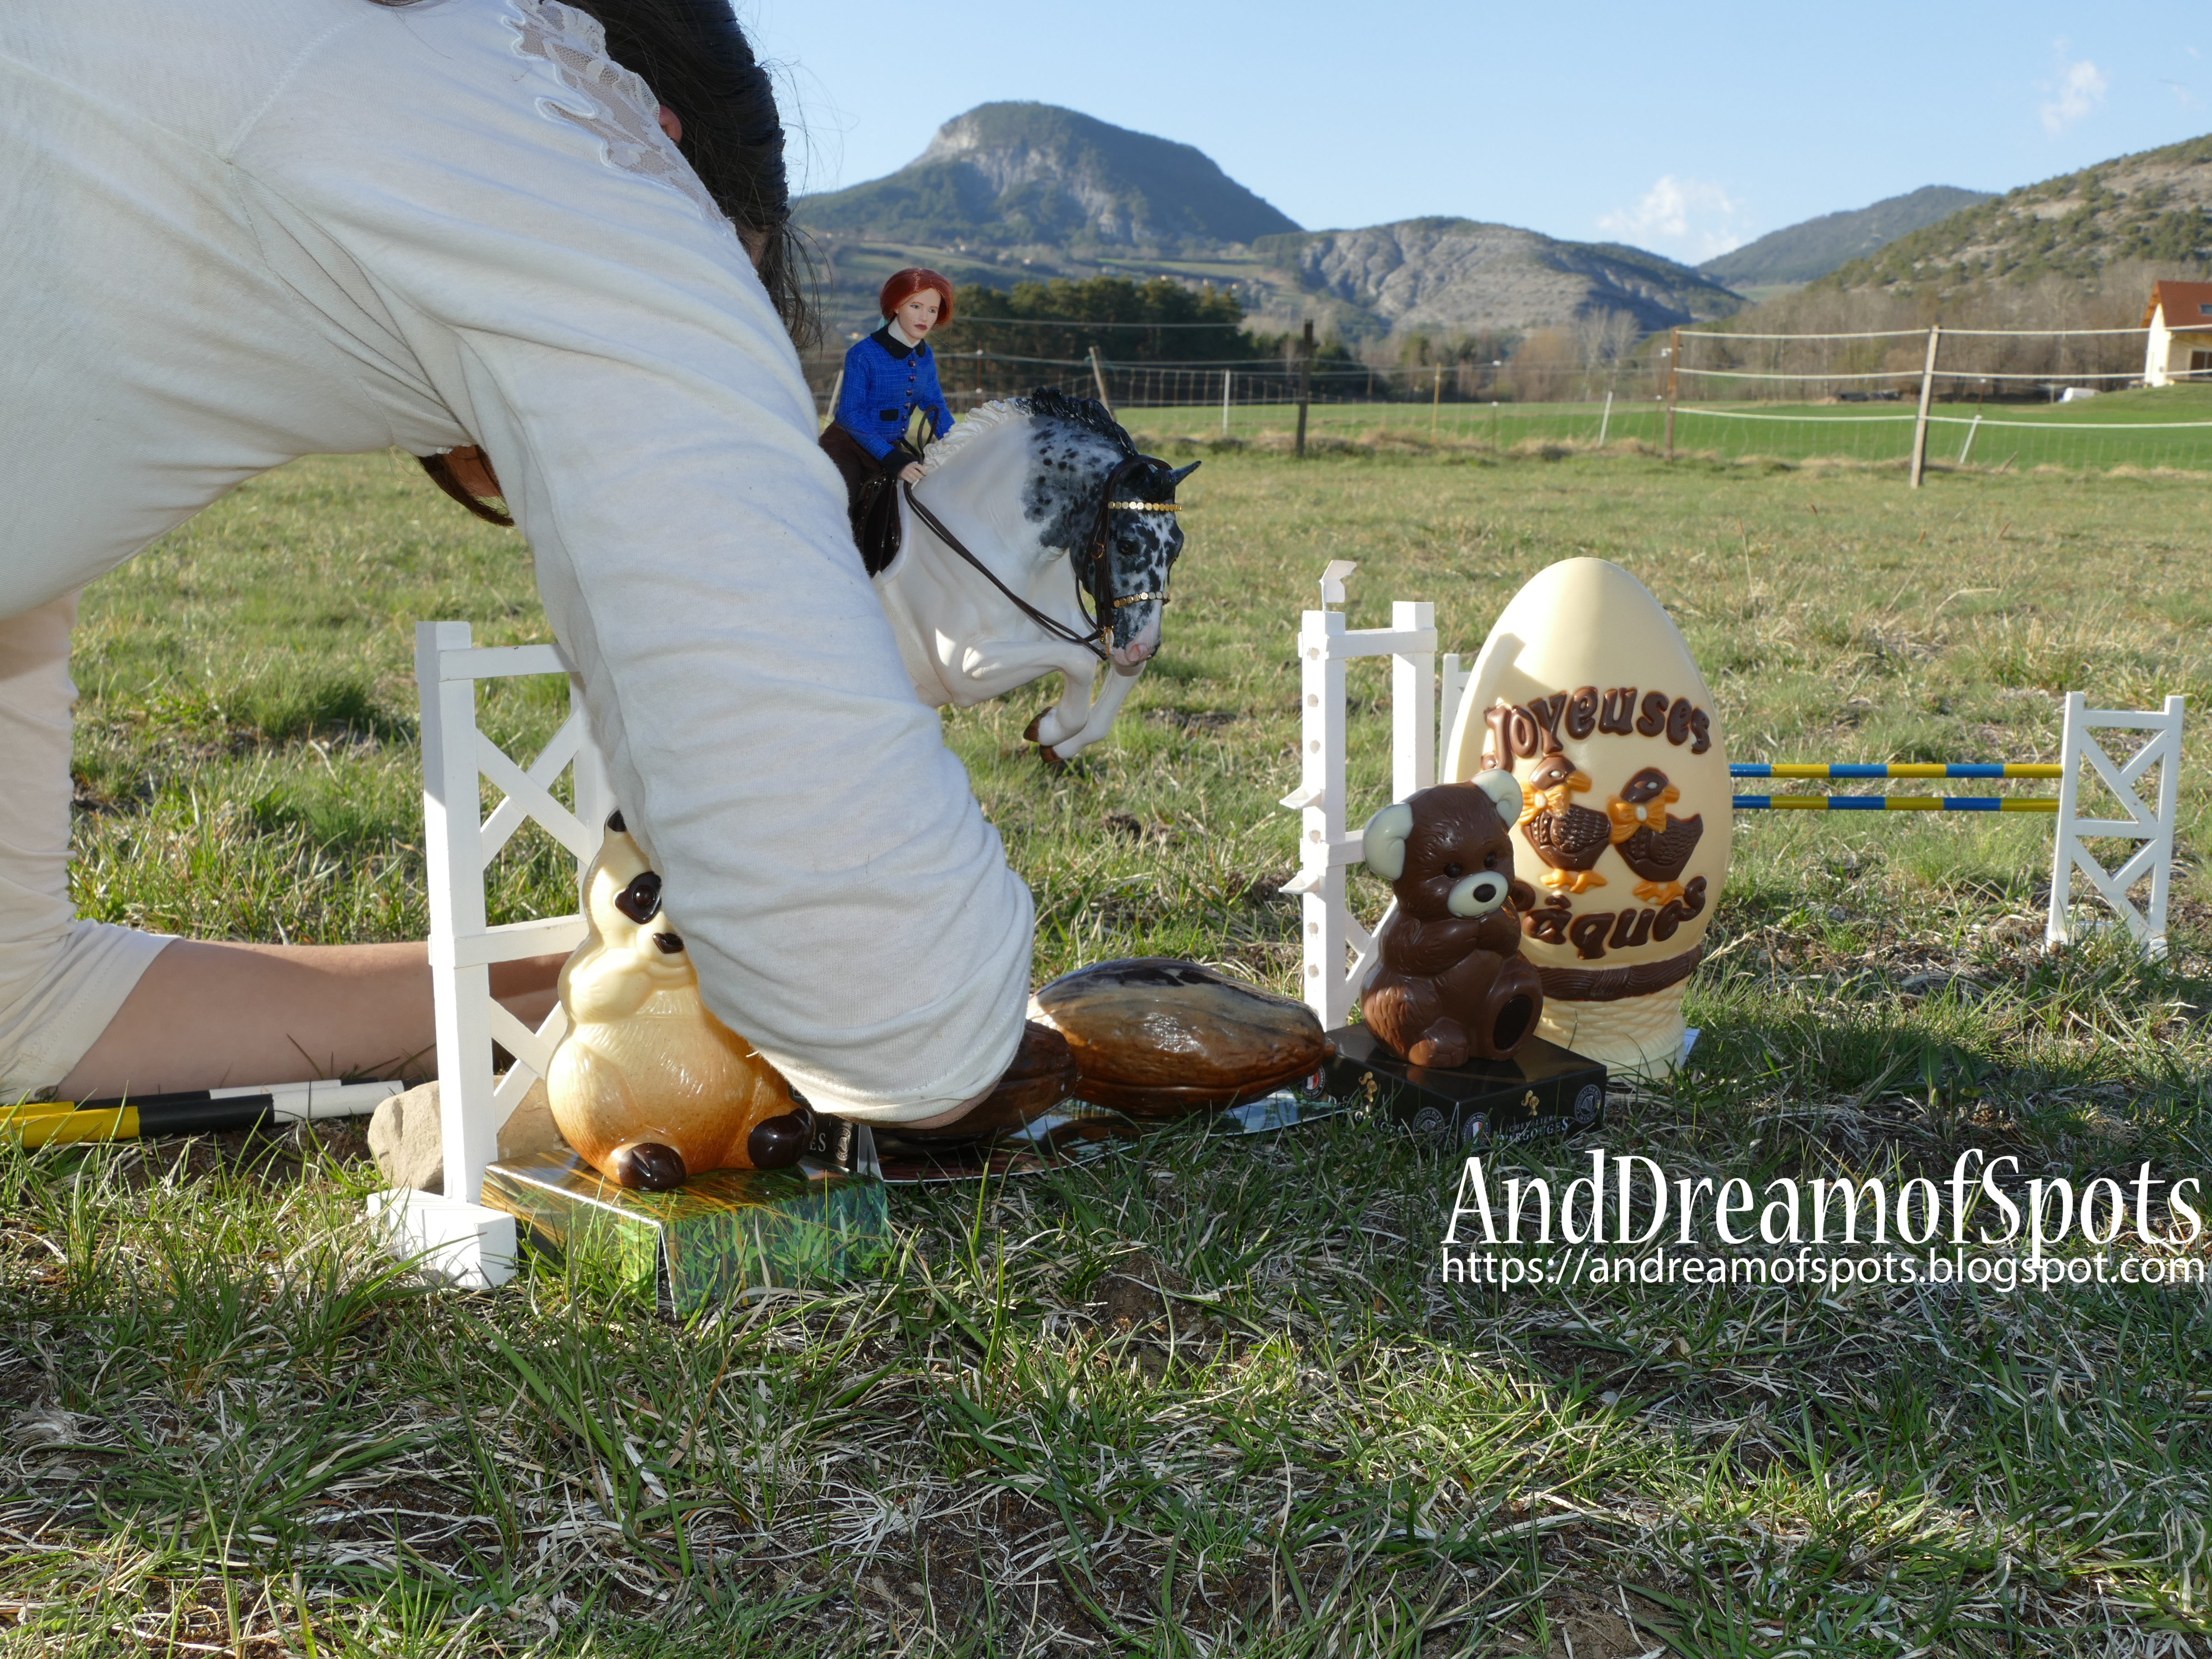
I LOVE chocolate figure and always feel like I need to do pictures with them before eating it.
So here's a chocolate jump (wich is an idea I got for ages now)!


And this picture wasn't an easy one, that's why I propose to you to talk about the "anatomy of a picture".

First of all, the last days were really HOT and chocolate melt, so I had to choose an hour of the day with less sunlight just to be sure.
Then I prepared my scenery, picking the right chocolate figure for the jump, and once ready, here I am rolling in the grass again...

 It smelled chocolate like crazy by the way.

Sunlight was still too much to my taste. I know most photographers loves best to have sun, but I prefers pictures with less to no sun. So while waiting for the sun to goes down, I played a bit with flash.

I don't like flash pictures, it create an artificial light and reflection on the subject that I just hate.
But I tryied. It was kind of okay, it have advantages, but that's definely not a fit to my taste.

Yes this picture is darker, but I loves it way, way better!

Then once the first point of view I wanted was secured, I tryed different ones, because you never know if there's any better!

Loves this angle...


Not to mention this one...

Playing with flash in fact, makes me discover how to do this... and I admit I kinda like that night shot effect. I like it way better than a normal flash feature and might re-use it for photoshow performance!

Yep thoses pictures were done in daylight - No there's no photoshop behind it! How cool?


So here's two advices that I apply at any pictures: do several pictures, try things... you never know what can be discovered!

Wich one is your favorite? And happy easter!

vendredi 28 décembre 2018

Craftings Skills (kind of)


Here's what I did got for Christmas.
No, not the horse. The fence.

It all started with a tree that felt into the pond. We got it out and it gave me the idea of crafting somethin' with wood.


Fortunately, I got help. So here it goes...
A fence was started. The branchs were carved to fit each other, then nailed. At the end we added a bit of glue, just in case.


I covered the base with moss so it will fade better in real ground.
It got a very natural and realistic looks! Here's a rustic fence in a field:


So what can be missing? Oh yes, a horse jumping over it!
Muuuch better! I take great care to have the perfect fit for traditional size.


But well, just doing a simpe fence wouldn't have been enough, so we did somethin' else I wanted for a while...
It took a long time looking for rocks and to glue them into a wall... we cemented with ashes from the mass stove. Yes, it's pure improvised crafting.


Saddly it's really small, because of the weight. But it will be enough to play with.
As an abandonned wall portion somewhere in ireland or as a jump... the whole thing is to make it looks natural.
So, some moss later,..


And with a pony, 'cuz it's always better...


I feel like I'm not done playing with these.
So sad it's not easy to move and carry everywhere! But having great props will be always a plus.

dimanche 8 juillet 2018

Beautiful Ultimate Bag

Well you remember my mother did me some pony pouches?
This time, she makes me a bag! :)

I'm often asked on "how I did pack my horses to take them everywhere" and it's really simple: in a bubble wrap pouch (for the most fragile) in a pony pouch in a grocery bag. Because those bags, in recycled plastic are the best as your horses will be stored 'side by side' and not 'one above the other' like in a backpack! But the problem for hiking with is that you have to handle them by hand.

So I asked for a grocery bag copy WITH a strap.
And then, the magic...


Yep I confirm it's the perfect breyer bag, with my seal of approval!


Of course, you need to handle the bag carefully.
So let's repeat:
-(Fragile) ponies (in Bubble wrap) in a pony pouch,
-Stored side by side in the ultimate bag
Ready to travel everywhere with you!

(should be better without the cat of course)
The bag is huge enough to allow you to store your camera and many other things in it too!
So, thanks ton to the gifted with couture mother.
How awesome is this bag?

jeudi 3 août 2017

FAQ : How to do Splashes?

The question n°1 I got was : How did you do splashes on your pictures?
Well, I already answered to that, but people still wants to know, so here's a reminder:

Splashes needs time & effort, they won't come easy and you're gonna need to be patient.

-If you don't go on shooting alone, so you're at least 2, just ask your friend/parent to throw littles rocks in the waters for you. And you just had to focus on taking pictures. That simple.

-If you're alone, well...
1. Don't be affraid of wet foot (really).

Or came on purpose with boots.
2. Place your figure in the water.
3. Be sure the figure is NOT gonna be taken by the water current.
4. Choose your framing, take a first picture without splash of what you want. (it would help you focus)


5. Be creative to make a stand for your camera, exemple, take some rocks. (Option: you have a real stand foot like a boss, I didn't).

Be attentive to your environment, to found what you need to make a stand & little rocks.
6. With your main hand you gonna take little rocks to throw, with the other your gonna pull the trigger,


7. Be calm and patient, throwing with your main head is better for precision, the stand for the camera gonna help your other hand to keep the camera focus. YOUR ANGLE MAY CHANGE A BIT during process.
8. Repeat, as long as needed. It may need several shots.

It can be long, it can be difficult, the result is the reward. Really. The following pictures were taken by me alone using the technique below, promess.


As you can see, the good picture can be really different than what you wanted first.

So now, you're ready to do all the splashes you want.